A Step by Step Guide to Growing Hydroponic Tomatoes
•Posted on May 27 2022

Last updated: March 25, 2026
Written by: Amir Tajer, B.S.M.E., QAL — Co-Owner & Technical Director, Greenway Biotech
Reviewed against: University of Hawaii, Ohio State University Extension, University of Arizona CEAC, and University of Florida IFAS Extension hydroponic production guidelines
Disclosure: Greenway Biotech manufactures Tomato Fertilizer 4-18-38, Cal-Mag Plus, and hydroponic nutrients mentioned in this guide. Alternative nutrient approaches and third-party systems are also discussed.
⚡ Quick Facts: Hydroponic Tomatoes
- Optimal pH Range: 5.5–6.5 for maximum nutrient uptake
- Ideal EC: 1.0–1.5 mS/cm for seedlings; 2.5–3.5 mS/cm for fruiting plants
- Light Requirement: 8–10 hours minimum; 14–18 hours for maximum fruit production
- Water Use: Hydroponic systems typically use up to 90% less water than soil-based growing[1]
- Best Starter System: The Kratky method — no pumps, no electricity, minimal maintenance
- Key Nutrient Pair: Tomato Fertilizer 4-18-38 + Cal-Mag Plus 2-0-0
- Temperature Range: 65–85°F (18–29°C) daytime; 60–68°F (15–20°C) at night
If you've ever grown tomatoes in your backyard, you know the struggle — inconsistent weather, pest invasions, soil-borne diseases, and the constant battle to keep plants fed and watered. Hydroponic tomato growing eliminates most of these headaches while giving you more control over every variable that affects fruit quality and yield.
Hydroponic tomatoes aren't just a novelty for tech-savvy gardeners. Research from controlled comparison studies shows that hydroponic systems are significantly more water-efficient than soil cultivation, and deep water culture systems can produce tomatoes with higher levels of lycopene and beta-carotene[1]. Soilless systems have also demonstrated faster plant development and a higher percentage of marketable fruit — averaging 92% compared to 77% for soil-grown crops[2].
Whether you're growing cherry tomatoes on a sunny windowsill or scaling up to a full greenhouse operation, this guide covers everything from choosing the right system and mixing your nutrient solution to troubleshooting common problems. We'll walk through the Kratky method for beginners, the ebb and flow system for intermediate growers, and the nutrient management strategies that make the real difference between mediocre and exceptional hydroponic tomatoes.
What Is Hydroponics?
Hydroponics is a method of growing plants without soil. Instead of extracting minerals from the ground, plant roots absorb nutrients directly from a water-based solution. The roots are supported by inert growing media — materials like coconut coir, perlite, clay pebbles (hydroton), or rockwool that provide structural support without contributing nutrients of their own.
The concept isn't new. Researchers at the University of Hawaii, including Dr. B.A. Kratky, have been developing passive hydroponic techniques since the early 2000s that make soilless growing accessible to home gardeners[3]. What's changed is the availability of pre-formulated water-soluble fertilizers that take the guesswork out of nutrient mixing — meaning you don't need a chemistry degree to get started.
The core principle is straightforward: plants need water, nutrients, oxygen, and light to grow. Soil is simply a delivery mechanism for some of these — and not always an efficient one. By delivering nutrients directly to the root zone in dissolved form, hydroponic systems give you precise control over what your plants eat, when they eat, and how much.
🔬 Did You Know?
A controlled study comparing soil and hydroponic systems found that hydroponic tomato plants were more water-efficient than soil-grown plants — yet fruit yield and sugar levels were comparable across all growing systems tested[1].
Why Grow Tomatoes Hydroponically?
Tomatoes are one of the most popular crops for hydroponic growing, and for good reason. They respond exceptionally well to the controlled nutrient delivery that hydroponics provides, and the results show in both growth rate and fruit quality.
| Factor | Hydroponic Tomatoes | Soil-Grown Tomatoes |
|---|---|---|
| Water Efficiency | ⭐ Up to 90% less water used | High water demand, significant runoff |
| Marketable Yield | ⭐ ~92% of harvest marketable[2] | ~77% of harvest marketable |
| Growth Speed | Faster development in controlled environments | Variable, weather-dependent |
| Pest & Disease Risk | Reduced — no soil-borne pathogens | Higher risk from nematodes, blight, etc. |
| Nutrient Control | ⭐ Precise, adjustable by growth stage | Limited control, depends on soil composition |
| Seasonal Limits | Year-round growing possible indoors | Seasonal in most climates |
| Lycopene Content | Equal or higher in DWC systems[1] | Varies by growing conditions |
The practical advantages go beyond the numbers. Hydroponic tomatoes grow without soil-borne diseases like fusarium wilt and root-knot nematodes. You eliminate the need for crop rotation. And because you're delivering nutrients in dissolved form through water-soluble fertilizers, every element is immediately available to the plant — no waiting for soil microbes to break down organic matter into plant-usable forms.
That said, hydroponic growing does require more attention to nutrient balance. In soil, the growing medium acts as a buffer against pH swings and nutrient imbalances. In hydroponics, you're the buffer — which is both the challenge and the opportunity.
Before You Choose a Hydroponic System
While the Kratky method works well for most beginners, the right system depends on your specific situation — space, budget, variety choice, and how much time you want to invest in maintenance. Use this framework before committing to a setup:
| Your Situation | Best System |
|---|---|
| First-time grower, limited budget, cherry or determinate varieties | Kratky method — minimal equipment, no electricity |
| ⭐ Intermediate grower, indeterminate varieties, want higher yield | Ebb and flow — better nutrient control, scales well |
| Want maximum fruit quality, comfortable with equipment | Deep Water Culture (DWC) — research-backed lycopene benefits |
| Commercial scale or 5+ plants of large varieties | Dutch bucket — industry standard for indeterminate tomatoes |
| Limited space, vertical or wall setup | NFT (Nutrient Film Technique) — efficient footprint |
| Warm climate, outdoor or greenhouse setting | Any recirculating system — prioritize solution temperature management |
💡 Start Small, Scale Up
Most experienced hydroponic growers recommend starting with a single Kratky bucket before investing in a larger recirculating system. The fundamentals of pH management, EC monitoring, and nutrient mixing are the same across all systems — and learning them at small scale saves significant time and money.
Choosing the Right Hydroponic System for Tomatoes
Not all hydroponic systems work equally well for tomatoes. Once you've assessed your situation above, here's what each system actually involves in practice.
Kratky Method (Best for Beginners)
Developed by Dr. B.A. Kratky at the University of Hawaii, this passive system requires no pumps, no electricity, and minimal maintenance[3]. Plants sit in net pots above a reservoir of nutrient solution. As the plant drinks the solution, an air gap forms between the water surface and the roots — this gap provides the oxygen that roots need to stay healthy.
The Kratky method works best for smaller determinate tomato varieties and cherry tomatoes. Larger indeterminate varieties can work but require bigger reservoirs — a full-sized tomato plant can consume 20–30 gallons of solution over its entire growth cycle[4], so plan accordingly.
Ebb and Flow (Flood and Drain)
This system periodically floods the root zone with nutrient solution, then drains it back to a central reservoir. The flooding provides nutrients and water, while the draining pulls fresh oxygen down to the roots. Ebb and flow systems handle larger tomato varieties well and scale up easily — making them a popular choice for indoor growing setups and small greenhouses.
Deep Water Culture (DWC)
In DWC, plant roots are fully submerged in aerated nutrient solution. An air pump keeps oxygen levels high enough to prevent root suffocation. DWC systems can produce excellent tomato yields and have been shown in research to produce fruit with higher beta-carotene and lycopene levels compared to both soil and drip irrigation systems[1].
Dutch Bucket System
The go-to for commercial hydroponic tomato production. Individual buckets connected by a shared drain line give each plant its own root zone while recycling nutrient solution. Dutch bucket systems handle the large root mass and heavy feeding demands of indeterminate tomato varieties without the reservoir size limitations of the Kratky method.
💡 Choosing Your Tomato Variety
For the Kratky method and DWC, start with determinate (bush) varieties like cherry or grape tomatoes — they have a more manageable root system and shorter growth cycle. Indeterminate (vining) varieties like beefsteak or Roma typically perform better in ebb and flow or Dutch bucket systems where you can support continuous growth and nutrient replenishment.
How to Grow Hydroponic Tomatoes with the Kratky Method (Step-by-Step)
The Kratky method is the simplest way to start growing hydroponic tomatoes. Here's a complete walkthrough — from setup to harvest.
Step 1: Gather Your Supplies
You'll need: an opaque container (a 5-gallon bucket works for one plant), a lid with a hole cut for a net pot, 3-inch net pots, growing media (coconut coir, perlite, or clay pebbles), your tomato seedlings, and a hydroponic nutrient solution.
The container must be opaque — light-proof — to prevent algae growth in the nutrient solution. A black 5-gallon bucket with a matching lid is the most common choice. For larger varieties, consider a 10-gallon container or a large storage tote.
Step 2: Start Your Seedlings
Germinate tomato seeds in rockwool starter cubes or a seed-starting mix. Keep them warm (70–80°F) and moist until sprouts appear, usually within 5–10 days. Once seedlings develop 2–3 true leaves, they're ready for transplant. If you're using rockwool, pre-soak the cubes in pH-adjusted water (pH 4.5–5.0) before planting seeds[5].
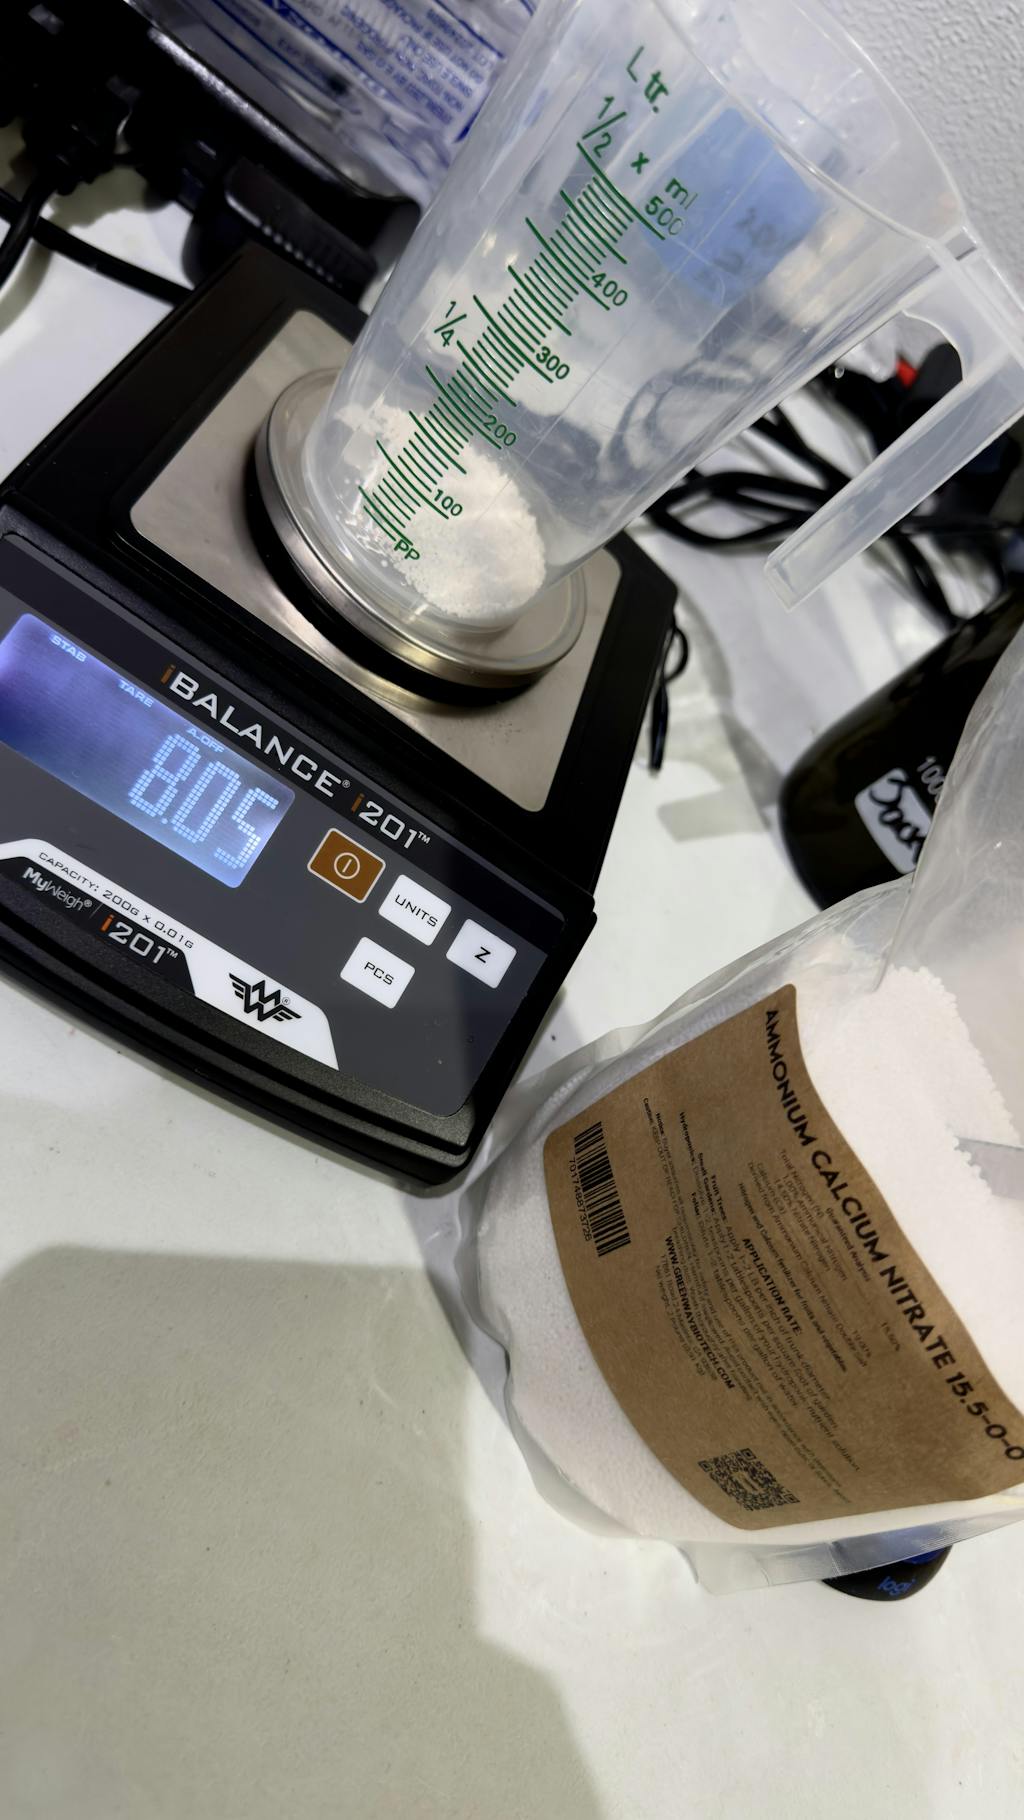
Step 3: Prepare the Nutrient Solution
Use Tomato Fertilizer 4-18-38 as your base. This water-soluble formula provides the phosphorus and potassium tomatoes need for strong root development and fruit production, along with chelated micronutrients including iron, manganese, zinc, and copper.
Add Cal-Mag Plus 2-0-0 to supply the calcium and magnesium that tomatoes demand in high quantities. Calcium is critical for preventing blossom end rot, and magnesium is the central atom in chlorophyll — without it, plants can't photosynthesize efficiently.
💡 Dosing Guide: Tomato Fertilizer 4-18-38 for Kratky
Mix: 5 grams (approximately 1 teaspoon) per gallon of water for seedlings; 10 grams (approximately 2 teaspoons) per gallon for mature plants
Apply: Fill reservoir to desired level — typically 3–5 gallons per plant
Dose received: Approximately 15–50 grams per plant per reservoir fill at mature rate
Coverage: One gallon of mixed solution fills one standard Kratky bucket to working level
Always verify against label directions, as concentration recommendations may vary by formula lot.
⚠️ Mixing Order Matters
Always add calcium-containing fertilizers to your reservoir separately from sulfate- or phosphate-containing fertilizers when pre-mixing concentrated stock solutions. At high concentrations, calcium ions react with sulfate and phosphate to form insoluble precipitates[6]. In a dilute working solution (like a single bucket filled with water), this typically isn't an issue — but if you're pre-mixing concentrates, keep calcium separate until final dilution.
Step 4: Set Up the Container
Fill the container with nutrient solution to a level that just touches the bottom of the net pot — about half an inch of submersion. This initial contact is crucial because the seedling's roots are still short. As the plant grows and drinks the solution, the water level drops naturally, creating the air gap that provides oxygen to the upper roots.
Step 5: Transplant
Place the seedling (still in its starter cube or with washed roots if transplanting from soil) into the net pot. Fill around it with your chosen growing media — coconut coir, perlite, or clay pebbles all work well. The media should support the plant upright and allow air circulation around the stem base.
Step 6: Place and Monitor
Position the system where the plant will receive at least 8–10 hours of light daily. Check the water level weekly. As the plant grows, refill the reservoir — but never fill it all the way back to the net pot. Leave the top several inches of roots exposed to air. This is the critical principle of the Kratky method: roots in the air gap absorb oxygen, while roots in the solution absorb water and nutrients[3].
Step 7: Support and Maintain
As tomato plants grow, they'll need physical support. Install stakes or a trellis system — especially for indeterminate varieties that can grow 6 feet or taller. Prune suckers (the shoots that grow between the main stem and branches) to direct energy toward fruit production rather than foliage.
🌱 Recommended: Tomato Fertilizer 4-18-38 + Cal-Mag Plus
Our Tomato Fertilizer 4-18-38 paired with Cal-Mag Plus 2-0-0 provides the complete nutrition package for hydroponic tomatoes — from seedling to harvest. Both are 100% water-soluble for clean nutrient delivery in any hydroponic system. Formulated and packaged by Greenway Biotech, Inc. — a California fertilizer manufacturer with over 35 years of experience, based in Madera, CA.
Shop Tomato Fertilizer 4-18-38Hydroponic Tomato Nutrients: What Your Plants Actually Need
Nutrient management is where hydroponic growing gets more technical — and where the real advantages show up. Unlike soil, where nutrients are released slowly and unevenly as organic matter decomposes, hydroponic solutions deliver every element in immediately plant-available form.
Macronutrients
Tomatoes require nitrogen (N), phosphorus (P), potassium (K), calcium (Ca), magnesium (Mg), and sulfur (S) in relatively large quantities. The specific amounts should change as the plant matures. Young plants need lower nutrient concentrations to avoid excessive vegetative growth, while mature fruiting plants require substantially higher levels — particularly of potassium and calcium — to support fruit development[6].
Potassium plays a central role in fruit quality, promoting sugar loading and cell turgor in maturing tomatoes. Calcium is essential for cell wall integrity — a deficiency typically shows up as blossom end rot[7]. Research from Ohio State suggests maintaining a potassium-to-calcium ratio of roughly 3:2 throughout the crop's life supports optimal fruit development[8].
Micronutrients
Tomatoes also need trace elements: iron (Fe), manganese (Mn), zinc (Zn), copper (Cu), boron (B), and molybdenum (Mo). These are required in small amounts but are no less critical. Iron deficiency is one of the more common issues in hydroponic tomato production — it often develops gradually, so watching for early interveinal chlorosis on new growth allows you to intervene before it becomes severe[8].
Chelated forms of iron, manganese, zinc, and copper remain available to plants over a wider pH range than unchelated mineral salts. The chelation process — wrapping the metal ion in an organic molecule like EDTA — prevents it from precipitating out of solution at higher pH levels. This is especially important in hydroponic systems where pH can drift over time.
🔬 Did You Know?
Ohio State University research recommends a phased nutrient approach for hydroponic tomatoes: lower EC for young plants (~2.0 mS/cm), increasing to full strength (~2.4 mS/cm) as the plant reaches mature fruiting stage[6]. Matching nutrient concentration to growth stage helps prevent excessive vegetative growth early and supports fruit quality later.
The Greenway Nutrient Approach
Our Tomato Fertilizer 4-18-38 is formulated specifically for tomato production with a high phosphorus and potassium ratio that supports root development and fruit set. It includes chelated micronutrients — iron, manganese, zinc, and copper in EDTA-chelated form — for reliable absorption across a range of pH conditions.
Pair it with Cal-Mag Plus 2-0-0 to supply the calcium and magnesium that tomatoes consume in large quantities. This combination covers all 16 essential plant nutrients in water-soluble, immediately available form.
For growers who want stage-specific nutrition from seedling through harvest, our Grow Green 4-2-6 provides the higher nitrogen ratio needed during vegetative growth, while Blossom Green 2-6-8 shifts the balance toward phosphorus and potassium for flowering and fruiting. Micro Green 2-0-3 delivers the complete micronutrient package for all growth stages.
pH and EC Management for Hydroponic Tomatoes
If there's one skill that separates successful hydroponic growers from frustrated ones, it's pH and EC management. In soil, the growing medium buffers against swings in both. In hydroponics, you don't have that safety net — which means monitoring and adjusting these values is part of your regular routine.
pH: The Gatekeeper of Nutrient Availability
The optimal pH range for hydroponic tomatoes is 5.5–6.5[5]. Within this range, all essential nutrients remain dissolved and available for root uptake. Step outside it, and certain elements become locked out — even if they're physically present in the solution.
Iron availability drops sharply above pH 6.5. Calcium and magnesium become less available below pH 5.0. Most nutrient lockout problems in hydroponics trace back to pH drift rather than actual nutrient deficiency — which is why testing your solution regularly is so important[9].
Adjust pH downward with phosphoric acid or citric acid. Adjust upward with potassium hydroxide. Make small adjustments and retest — overcorrecting is a common beginner mistake.
EC: Measuring Nutrient Strength
Electrical conductivity (EC) measures the total dissolved salts in your nutrient solution — essentially, how concentrated it is. For hydroponic tomatoes, target EC values shift with growth stage[6]:
| Growth Stage | Target EC (mS/cm) | Notes |
|---|---|---|
| Seedling / Transplant | 1.0–1.5 | Half-strength nutrients to prevent salt stress |
| Vegetative Growth | 2.0–2.5 | Increase nitrogen for leafy growth |
| ⭐ Flowering / Fruiting | 2.5–3.5 | Shift toward higher K and Ca for fruit quality |
An EC that's too high creates osmotic stress — the roots can't pull water from a solution that's saltier than their internal fluids. An EC that's too low means plants aren't getting enough nutrition. Either way, the result is typically stunted growth and poor fruit quality[9].
💡 Solution Replacement Schedule
For Kratky and DWC systems, replace the entire nutrient solution every 2–3 weeks. As plants selectively absorb certain ions over others, the solution's nutrient ratios drift away from optimal levels — even if the overall EC looks fine. Fresh solution resets the balance. For recirculating systems like ebb and flow, test and adjust more frequently.
Light, Temperature, and Environmental Control
Light Requirements
Tomatoes are high-light crops. They need a minimum of 8–10 hours of direct light daily, and mature fruiting plants typically produce best with 14–18 hours of light followed by a dark period for respiration[5]. If you're growing indoors, LED or metal halide grow lights can supplement or replace natural sunlight.
Insufficient light is one of the most common reasons indoor hydroponic tomatoes set flowers but fail to produce fruit. If your plants are tall, leggy, and slow to flower, they likely need more light.
Temperature
Hydroponic tomatoes generally grow best with a daytime temperature of 65–85°F (18–29°C) and a nighttime drop to 60–68°F (15–20°C). This day/night differential promotes proper fruit development and helps the plant allocate energy efficiently. The nutrient solution temperature should stay between 65–75°F (18–24°C). Warmer solution holds less dissolved oxygen, increasing the risk of root rot in your hydroponic system.
Ventilation and Humidity
Good airflow serves multiple purposes in hydroponic growing: it prevents fungal diseases, strengthens plant stems, and helps with pollination. In greenhouses or grow rooms, an exhaust fan and oscillating fans provide both air exchange and air movement around the plant canopy.
Humidity generally works best between 50–70%. Too high and you invite fungal problems. Too low and the plant transpires too much water, concentrating salts at the root zone.
🔬 Did You Know?
Hydroponic tomatoes grown indoors require hand pollination because they lack the wind and insect activity that outdoor plants rely on. Simply tap or vibrate the flower clusters daily — an electric toothbrush held against the stem works well. Commercial growers typically use bumblebees or mechanical pollinators for this purpose.
Troubleshooting Common Hydroponic Tomato Problems
Most hydroponic tomato problems show visible symptoms before they become severe. Learning to read those symptoms early — and distinguish between causes that look similar above ground — is the skill that separates consistent harvests from frustrating ones.
| Symptom | Likely Cause | First Step |
|---|---|---|
| Dark, sunken spots on bottom of fruit | Calcium uptake failure (blossom end rot) | Check EC, watering consistency, and K:Ca ratio; ensure Cal-Mag Plus is in solution |
| Yellowing from older (lower) leaves upward | Nitrogen or magnesium deficiency | Check EC; if pH is correct, increase nutrient concentration or add Cal-Mag Plus for Mg |
| New growth yellows, veins stay green | Iron deficiency or pH-induced lockout | Check pH first — iron locks out above 6.5; if in range, add Chelated Iron EDTA or Chelated Iron DTPA |
| ⭐ Slimy brown roots, earthy odor | Root rot (Pythium or Phytophthora) | Remove affected material, sterilize system, refill with fresh solution; see root rot guide |
| Tall, leggy plants; flowers but no fruit | Excess nitrogen or insufficient light | Reduce nitrogen in nutrient solution; ensure 10+ hours strong light daily |
| White crusty deposits on growing media | Salt accumulation | Flush with pH-adjusted plain water; replace solution completely |
| Wilting despite adequate solution level | Root rot blocking water uptake, or high EC osmotic stress | Inspect roots; if slimy, treat for root rot; if firm, check and reduce EC |
| Slow growth, pale green color overall | Nutrient solution too dilute (low EC) or cold solution temp | Raise EC to target range; verify solution temp is 65–75°F |
💡 Check pH Before Adding Nutrients
Before diagnosing a nutrient deficiency, always verify your pH is within the 5.5–6.5 range. The majority of micronutrient deficiency symptoms in hydroponics are caused by pH-induced lockout, not actual absence of the element in solution. Fix the pH first, then reassess in 3–5 days before adding supplemental nutrients.
🎯 Key Takeaways
- The Kratky method is often the easiest entry point — no pumps, no electricity, just a container, net pot, and nutrient solution. Scale up to ebb and flow or Dutch bucket as experience grows
- Maintain pH between 5.5–6.5 and adjust EC by growth stage: 1.0–1.5 mS/cm for seedlings, up to 2.5–3.5 mS/cm for fruiting plants
- Tomato Fertilizer 4-18-38 + Cal-Mag Plus 2-0-0 covers the full nutrient profile for hydroponic tomatoes across all growth stages
- Blossom end rot is a calcium uptake issue, not just a deficiency — check watering consistency, EC, and K:Ca ratios before simply adding more calcium
- Provide 8–10 hours minimum light for vegetative growth; 14–18 hours for maximum fruit production
- Replace nutrient solution every 2–3 weeks in non-recirculating systems to prevent ion imbalance and salt buildup
- Browse our full hydroponic nutrient collection for stage-specific formulas
❓ Frequently Asked Questions
What is the best hydroponic system for growing tomatoes?
For beginners, the Kratky method works well for most situations — it needs no electricity or pumps and handles cherry and determinate varieties reliably. For larger plants and higher yields, ebb and flow or Dutch bucket systems offer better nutrient control and support for indeterminate varieties. Deep water culture (DWC) is another strong option, with research indicating potential benefits for fruit quality including higher lycopene levels[1].
What nutrients do hydroponic tomatoes need?
Hydroponic tomatoes need all 16 essential plant nutrients delivered through the solution. Primary macronutrients are nitrogen, phosphorus, and potassium. Secondary macronutrients include calcium, magnesium, and sulfur. Micronutrients — iron, manganese, zinc, copper, boron, and molybdenum — are needed in trace amounts. A water-soluble tomato fertilizer paired with a calcium-magnesium supplement typically covers all of these.
What pH level is best for hydroponic tomatoes?
Maintain your nutrient solution between pH 5.5 and 6.5 for optimal nutrient availability. Most growers aim for 5.8–6.3 as the sweet spot. Check pH at least twice per week and adjust with phosphoric acid (to lower) or potassium hydroxide (to raise). pH drift is the most common cause of nutrient lockout in hydroponic systems.
How do I prevent blossom end rot in hydroponic tomatoes?
Blossom end rot results from insufficient calcium reaching developing fruit — but the cause is often uptake failure, not absence of calcium in solution. Ensure adequate calcium (150–200 ppm is typical), maintain consistent water levels, keep the potassium-to-calcium ratio at roughly 3:2, and avoid letting EC climb too high. Using Cal-Mag Plus alongside your base fertilizer helps maintain adequate calcium and magnesium levels throughout the crop.
How often should I change the nutrient solution?
For non-recirculating systems (Kratky, DWC), replace the entire solution every 2–3 weeks. Plants selectively absorb certain nutrients over others, causing the solution composition to drift from optimal ratios over time — even when overall EC looks fine. Top off with plain pH-adjusted water between full changes if levels drop significantly.
Can I grow hydroponic tomatoes indoors year-round?
Yes. With adequate lighting (LED or metal halide providing 14–18 hours daily), temperature control (65–85°F daytime), and proper nutrition, hydroponic tomatoes can produce year-round indoors. You'll need to hand-pollinate flowers since there's no wind or insect activity — tapping flower clusters daily or using a vibrating tool works well.
Is hydroponic tomato growing more expensive than soil growing?
Initial setup costs are typically higher for hydroponics due to containers, growing media, pH/EC meters, and potentially grow lights. However, ongoing costs can be lower — hydroponic systems often use up to 90% less water, precise nutrient delivery reduces fertilizer waste, and the elimination of soil-borne pest and disease management saves money over time. A basic Kratky setup can start for under $30.
📚 Sources
- Controlled Comparisons Between Soil and Hydroponic Systems Reveal Increased Water Use Efficiency and Higher Lycopene and β-Carotene Contents in Hydroponically Grown Tomatoes — Scientia Horticulturae (2021)
- Comparative Performance of Tomato Cultivars in Soilless vs. In-Soil Production Systems — International Society for Horticultural Science (Maboko et al., 2009)
- Non-Circulating Hydroponic Methods — University of Hawaii College of Tropical Agriculture (Kratky)
- Growing Large Flowering Plants Like Tomatoes Using the Kratky Method — Science in Hydroponics
- Hydroponic Tomato Nutrition — University of Arizona Controlled Environment Agriculture Center
- Hydroponic Nutrient Solution for Optimized Greenhouse Tomato Production — Ohio State University Extension
- Nutrient Guidelines for Hydroponic Tomato Production — Hort Americas
- Growing Tomatoes in Hydroponics — ACS Distance Education / Hortcourses
- Electrical Conductivity and pH Guide for Hydroponics — Oklahoma State University Extension
- Nutrient Solution Formulation for Hydroponic Tomatoes in Florida — University of Florida IFAS Extension
Comments
0 Comments
Leave a Comment